a. Minimize the number of linked or imported DWG files.
b. Avoid importing unnecessary data like hatching or AutoCAD®-specific linework such as construction lines. Delete unnecessary parts and layers of the DWG file within AutoCAD and import only the cleaned, smaller DWG.
c. Avoid exploding the geometry imported from DWG files. The exploding operation within a Revit-based application can change a DWG from a single managed element to hundreds or thousands of additional elements depending on the number of entities in the imported DWG.
d. Only link essential DWG files into necessary views.
e. Switch off visibility of 2D AutoCAD DWGs in perpendicular views. A 2D AutoCAD file linked into a plan view will show as collinear lines in elevation, causing performance degradation.
Thursday, 31 July 2008
Friday, 25 July 2008
Asymmetric Plate Girder ....
There were some issues with the Asymmetric Plate girder ( W_ASPG) these have now been resolved and it's also been given an overhaul. So it now works a lot better.
 To complement this Plate Girder Family we have also added a Schedule to our Template which which will list out all your plate Girders and their parameters.
 To complement this Plate Girder Family we have also added a Schedule to our Template which which will list out all your plate Girders and their parameters.
Thanks to Darren Snook for helping with this.
Thursday, 24 July 2008
Project North and Shared Co-Ordinates …
This has been made a lot easier in RS2009. Meaning it behaves as expected and works.
First off import/link the Survey or Architects drawing you are going to use as the base as you would do normally using Centre to Centre.
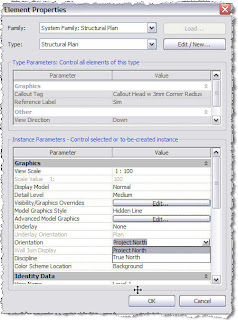
Switch your view to Project North.
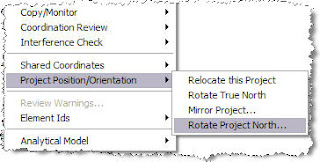
 Then go to Tools --> Project Position/Orientation --> Rotate Project North ..
 Then just follow the instructions in the dialogue box.
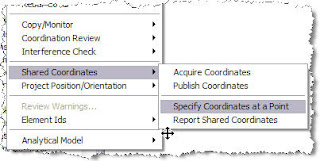
Then go to Tools --> Shared Coordinates --> Specify Coordinates at a point
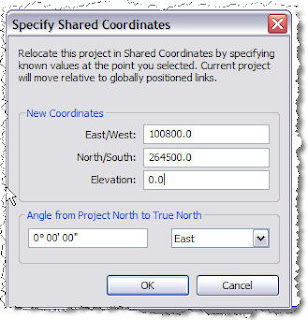
 Then fill in the dialogue box as required. The units depends on how you linked in your original drawing.
Your Revit model is now co-ordinately correct.
First off import/link the Survey or Architects drawing you are going to use as the base as you would do normally using Centre to Centre.
Switch your view to Project North.
 Then go to Tools --> Project Position/Orientation --> Rotate Project North ..
 Then just follow the instructions in the dialogue box.
Then go to Tools --> Shared Coordinates --> Specify Coordinates at a point
 Then fill in the dialogue box as required. The units depends on how you linked in your original drawing.
Your Revit model is now co-ordinately correct.
Wednesday, 23 July 2008
Right Mouse Click over View Cube ...
You can quickly create 3D Sections, Plans and Elevations etc ... by Right Mouse Clicking over the View Cube in a 3D view then going to Orient to View and picking the view you wish to create a 3D view of. Then just shift+middle button to orbit as you would normally.
 I have found this tool extremely useful and I'm sure you will.
 I have found this tool extremely useful and I'm sure you will.
Tuesday, 22 July 2008
Break Lines ....
Friday, 18 July 2008
Naming of Revit models !!!
The naming of Revit model files should follow a similar pattern to the naming of any other CAD file.
So ... If you are not using worksets and therefore don't have a Central file the name should be along the lines of ... Job Number-Project Name.rvt for example 12345-a buliding.rvt and this file should reside in a folder called 3D ( The folder is called 3D and not just Revit in case you have any other 3D format files ie. Navis or 3ddwf ) under the Cad directory.
If you are using worksets and therefore have a Central file the name should be ..... Job Number-Project Name-Scentral.rvt ( the S before central meaning Structures ) and this file should reside in a folder called 3D under the Cad directory.
Your Local file name should be ... Job Number-Project Name-logon name.rvt for example 12345-a building-csmfh.rvt and this file should reside on your C: .
Any comments ????
Thursday, 17 July 2008
Asymmetric Plate Girder & Asymmetric Plate Column
We have developed two new families for Asymmetric Plate Girders ( W_ASPG.rfa ) & Asymmetric Plate Columns ( W_ASPC-Column.rfa ).
Once loaded their use should be self explanatory.
 These can be found in MasterDocs\CAD\Revit\Waterman Library\Families\Steel and MasterDocs\CAD\Revit\Waterman Library\Families\Columns.
Once loaded their use should be self explanatory.
 These can be found in MasterDocs\CAD\Revit\Waterman Library\Families\Steel and MasterDocs\CAD\Revit\Waterman Library\Families\Columns.
Have you discovered anything in Revit ?
Have you found anything in Revit while I have been away enjoying myself on holiday that you would like to share with the rest of us ??
If so e-mail it to me and I will post it up here.
If so e-mail it to me and I will post it up here.
Subscribe to:
Comments (Atom)


