The Revit platform originally implemented Worksets as a mechanism to enable multiple users to collaborate on a single model by taking temporary ownership of user-defined element groups. Making an entire Workset editable, or “Checking out” a Workset, prevented other users from editing any part of that Workset until control was relinquished on a Save to Central operation.
Revit® Architecture 8.0 implemented transparent element borrowing, which automatically assigns ownership of an edited element to a user, allowing more intuitive interaction with the model in a multi-user environment. Using element borrowing, users select the elements to edit, allowing the Revit platform to silently grant and manage ownership of the elements until the user’s next Save to Central makes the edited elements available to all other users of the model.
Worksets remain extremely valuable for data segregation and managing workflow, since they enable selectively opening and closing portions of a project across all project views. This level of control can represent an advantage over view dependent features such as View Filters or Visibility / Graphics in certain workflows.
While the capability to check out a Workset remains valuable under certain circumstances outlined below, in general the best practice is to utilize Element Borrowing rather than checking out entire worksets. The Revit platform team recommends that Worksets should be employed most often to segregate conceptual areas of a project, such as:
o Separate buildings
o Grid and levels
o Building core
o Building shell
o Spatially identifiable areas of a single building (wings, for example)
o Linked RVT and DWG files
o Room or Space Separation Lines (see Volumes - Rooms and Spaces section)
Checking out a Workset may occasionally be of use if certain model elements, such as the building grid or linked files, need to be protected from accidental change. In that event, BIM managers or team leaders will sometimes check out a Workset containing project elements that should not be casually edited or relocated.

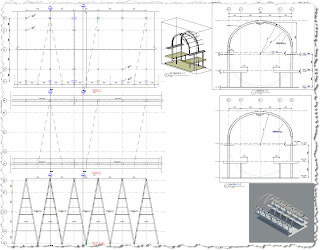
 Define a level slab using the same plan profile. This will give identically vertical corresponding points, which can then be snapped onto the ramp using the warping function.Snap by clicking the either the blue down o
 r up arrow (but not the square grip though) and dragging onto the corresponding point.Don’t worry about the following warning message. Once all the points are done, it will correct itself.
 Delete the ramp to leave the slab only.
 Now walls can be attached to the warped slab, openings can be cut and floor finishes added.


 Thanks to Gary McMahon & Andrew Cullen for sharing.
 Then place your section mark and Revit will name and number it the same as the original.

 Thanks to Nick Stokes for sharing.


