Showing posts with label Views. Show all posts

Wednesday, 5 February 2014

View Range and Phase Filters

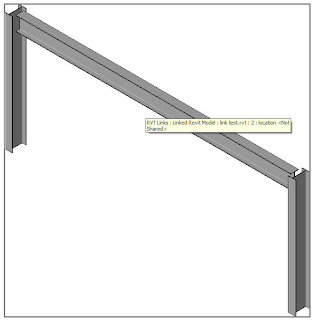
A recent problem arose where phase filters are used to show demolished columns. In 3D and section views, everything appeared fine, but in plan, these columns weren't changing appearance as per the phase filter override. The suspected cause was in the view range for the plan and after a bit of head scratching, it was determined that the columns whose tops terminated within the 'View Depth' band of the view range would ignore the phase filter overrides. This has been recreated in the images below:


Projection - No Phase Filter


Projection - Phase Filter Applied


Cut - No Phase Filter


Cut - Phase Filter Applied


View Depth - No Phase Filter


View Depth- Phase Filter Applied


I'm not going to go into a full explanation of how view ranges work, but there are a couple of very good ones by others here and here that helped me get to the bottom of this.

Wednesday, 1 February 2012

Section Marks - Some Observations

A problem that seems to come up sometimes is getting section marks to look consistent on a series of floor plans. For grids and levels, the 'Propagate Extents' function serves this purpose, but doesn't extend to section marks. In absence of this, I set out to discover the rules that dictate how section marks behave in relation to views


The Scenario


The plan on the right (Level 1) is the view in which the section mark was placed. Both views are set to an identical crop box. The extents are at the border between the pink and blue shading (more on this in a minute)  As you can see, the marks display as required


Now in the plan on the left (Level 2), the view crop is adjusted. All four sides are within the shaded areas and the section mark remains unaffected


Moving one of the crop extents outside of this shaded area, the section mark revokes to its default initial view.

Conclusion

In short, there is a zone of 63.5mm (or 2.5" in old money), multiplied by the view scale.
This is applicable inside and outside the crop extents. (shown here as pink and blue).  
It relates to the view where the section mark is placed and governs the display in other views. Should the original view crop extents change, this zone will amend with it. Providing all four extents in any other views are within this zone, the section mark will remain unaffected

 
In standalone views (ie non-dependent), the best way to control this is through a scope box. In dependent views, it is best to place and adjust the section mark in the 'Child' view, rather than the 'Parent View'.

Tuesday, 18 January 2011

Hide those Unreferenced View Tags

This is a quick tip for hiding unreferenced section, elevation and callout tags in a view in Revit 2011:
  • Go to 'Filters' on the 'View' Tab

  • Create a new filter called 'Model Views' and set 'Define Criteria'

  • Under Categories, check 'Callouts', 'Elevations' & 'Sections'

  • Under Filter Rules, set Filter by 'Sheet Number'. Select 'does not contain' from the drop down box and leave the box under that blank


  • Click apply & ok. Now go to the view you want to hide the tags. Go to Visibility/Graphics, select the 'Filters' tab and add the filter. Uncheck the 'Visibility' box and click ok. To switch the unreferenced tags back on, simply go into v/g again and check the box


Thursday, 21 May 2009

Turning off individual elements in a linked Revit model

We often have the need to link Revit models to each other and then "Hide in View" certain bits and pieces.

As you will know if you hover over the linked model Revit will put a box around it and display some information about it.

If you hover over the item you wish to hide and hit the tab key to will be able to select it and then hide in view.


Tuesday, 17 March 2009

Rotating an individual view is very straight forward in Revit.

Select the Crop Region and then just use the rotate tool.

Tuesday, 10 March 2009

Showing hidden lines of in-place Families.

Quite often In-place Families families don't show their hidden lines and the show and remove hidden line tools are disabled when the graphics style is set to hidden line.

Strange but true.

If you switch the view discipline from Structural to Architectural then these tools are enabled.


Apply the hidden lines by first clicking the object you want to see through, then the object you want to see under.

Remember to switch your view back to Structural afterwards.

Monday, 2 March 2009

Detail View: Detail as opposed to a Section: Bulding Section.

If you want a view on sloping roof and have been stumped by the fact that normally Section Marks are restircited to Vertical or Horizontal. just change them to Detail View: Detail
and you can then draw them at any angle.

After setting up a work plane etc.. this can help enormously when trying to set out bracing.

Thursday, 19 February 2009

Section Marks show up at 1:100 but not at 1:200

even though the plan area shown is exactly the same !!
This question seems to come up every now and then and the answer is easy. Once you know it.
If you look at the element properties of the section mark you will see " Hide at scales coarser than " if the value is 1:100 then they won't show at 1:200.


Monday, 15 December 2008

While we are on the subject of Section Marks ....

To get a "jogged" Section Mark. Selecting the Section Mark makes the Split Segment button wake up.Pick Split Segment then select the Section Mark. you can then drag one part of the Section Mark around.

Monday, 8 December 2008

Section Marks can at times be quite over powering ...

One way to trim them down a bit so that they don't cover up to much of your drawing.

Just click on the break in the middle of the section mark. You can then also grab the drag points to make the section marks lines even smaller.


Monday, 24 November 2008

Another option to Label Viewports.

Following on from my post of the 3rd October I have added an Enlarged Detail ...This is again to get something more like we are used to ...

Thursday, 13 November 2008

How to show "Hatch" patterns in coarse detail.

I have been asked this a couple of times recently.
There are people out there that like to show steel beams in coarse mode ( single lines ), but, when they do the fill ( hatch to us old draughtsman ) in core walls doesn't display.

This is easily remedied.
Select the wall and go to its element properties --> Edit/New and under Graphics you will see Coarse Scale Fill Pattern. Select this via the three little dots and choose the desired fill pattern.

Tuesday, 21 October 2008

I have created a mapping file for when you need to export

your views / sheets out to AutoCAD dwg files. The mapping file can be found in \MasterDocs\CAD\Revit\Waterman Library and is called WGPLC-exportlayers-dwg.txt
To do this go to --> file --> Export --> CAD Formats
Then go to Layer SettingsIf not already loaded you can Load and Browse to the file ..

As always if you find anything I have missed or got wrong please let me know.

As most of you already know ..... I do make mistakes.

Wednesday, 23 July 2008

Right Mouse Click over View Cube ...

You can quickly create 3D Sections, Plans and Elevations etc ... by Right Mouse Clicking over the View Cube in a 3D view then going to Orient to View and picking the view you wish to create a 3D view of. Then just shift+middle button to orbit as you would normally.
I have found this tool extremely useful and I'm sure you will.