Showing posts with label Materials. Show all posts

Thursday, 12 July 2012

Sharp Elbows - New Revit 2013 'Structural Material' Parameter and Model Upgrade Problems

The purpose of this post is to shed a bit of light on a Revit 2013 model upgrade problem. It will also assume a certain level of Revit knowledge

The materials functions have been seriously overhauled for Revit 2013.
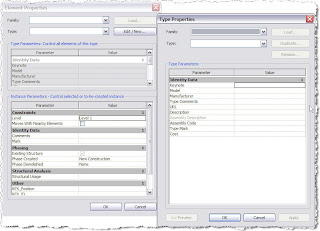
On the Structures side, a new built-in parameter 'Structural Material' has been introduced.


This parameter is non-modifiable and non-removable. It can only be altered from 'Instance' to 'Type' and vice-versa. The function is by design and appears to be for the purpose of using extended information for calculation and to provide a more fixed and stable platform in the structural model for third party analysis software linking

When family files are updated in Revit 2013, the upgrade elbows out any existing material parameter and replaces it with this.

However, we have discovered a slight complication with this. Take specifically families which have a nested component, and the material parameter in this nested component is linked to a material parameter in the host.

If you open the family file directly in Revit 2013, the upgrade process will 'sever' this link, but it will upgrade.

If you are upgrading a project that contains such a family, the upgrade will fail for these elements and Revit will require that these are deleted from the model before continuing. This is happening here with our Pile Cap families, which have a Pile family nested inside.

To get around this, you have to open the project model in the previous Revit version and edit the offending families to de-couple the material parameter link. The model will now upgrade in Revit 2013. You can now re-edit these families to re-couple the parameters, then reload back into the model.  You may also want to consider changing the previous material parameter to the new 'Structural Material' to take advantage of the new functionality

I trust this helps and is clear, but please feel free to comment

Wednesday, 26 January 2011

Steel Weight - A Conversation, Further Thought and Another Method


  • A Conversation
Mike: "So, the Revit weight schedule calculates using volume?"


Me: "Yes"


Mike: "So when you put a service hole in a beam, it subtracts it from the volume?"


Me: "Yes"


Mike: "But when you buy steel, it doesn't come with holes in. Shouldn't the weight takeoff reflect this?"


Me: "Ahh... Good point"


  • Further Thought
In order to overcome this, the weight can be calculated using kg/m multiplied by length. In my mind, this presents a couple of issues:

  1. How to get a steel length from a column
  2. How to make it multi-category, so it all appears on one schedule
Fortunately, our families all contain cross-sectional area figures 'A', calculated automatically by formula based on the parametrics of the profile. The kg/m value 'M' is calculated from this:


  • Another Method

The solution to both problems is to introduce a new shared parameter, 'Section Length' to all the steelwork families. This is set to 'instance' and set as a reporting parameter. A dimension is then run from one end of the beam/column to the other and is set to this parameter. Because it is a reporting parameter, whatever length the beam/column is, its value is fed back to 'Section Length'. This can then be used to calculate the weight. The following video demonstrates this concept


Sunday, 23 January 2011

Steel Weight - A Method and Some Thoughts


There are a lot of bit and pieces online regarding steel weights in Revit Structure. The aim of this post is to pull some of it together and to add my own thoughts. The video goes through the procedure for creating the schedule and the information below discusses the finer points
  • Before You Start, Content is Critical

We abandoned the OOTB steel families early on and generated our own family content. This allowed us to take a much more holistic approach to the content. In the video example, there are 'Universal Beam' members of both 'Structural Column' and 'Structural Framing' Categories. These families are driven by identical parameters, profiles and most importantly, Type Catalogues. All our steelwork families contain two parameters, 'Section Type' and 'Section Name'. These are only ever used in Steel Families and they allow us to isolate steelwork in schedules. In the case of the example, the values of these two parameters are consistent in both 'Universal Beam' of 'Structural Column' and 'Structural Framing' categories. This allows us to consolidate all 'Universal Beam', regardless of family category, together in a multi-category schedule


  • Some Points on Volume

    In the 'Material Take-Off' schedule, the parameter 'Material : Volume' is used to calculate the weight. The material parameters in Revit Structure are only available for the following family categories:


  • Revit will calculate volume based on the medium level of visibility. Another reason we abandoned the OOTB families is that for all rolled sections, the root radii are omitted in the medium level of detail, so the weights were coming out incorrect. Hence our content shows a full profile for both medium and fine detail to get the correct volume.

  • The calculated value in full is Volume multiplied by Density. The syntax is:
    (Material : Volume/1)*7.85
  • The parameter 'Material : Volume' must be divided by 1 to neutralise m³ to a number to avoid an 'Inconsistent Units' error.
  • 7.85g/cm³ is the metric density value of mild steel (in old money, this is 0.284 lb/in³).
  • Elements must have physical material applied to them in order to appear in the schedule. I'd recommend that a generic steel material is applied in the family by default so they will show up regardless

So that pretty much sums it up. Hopefully this will be of some help

Thursday, 17 September 2009

We have added a new Schedule to our Template.

This new Schedule will give a total weight of steelwork as long as you have used the Waterman Families in the model. I'ts also dependant on a material being assigned to the steel ( i.e. not left to be ).
You can also copy and paste this schedule into existing projects from \Masterdocs\CAD\Revit\Waterman Library\Families\Schedules but, again I would point out it will only work correctly if using Waterman Families and Materials are assigned.

Thursday, 13 November 2008

How to show "Hatch" patterns in coarse detail.

I have been asked this a couple of times recently.
There are people out there that like to show steel beams in coarse mode ( single lines ), but, when they do the fill ( hatch to us old draughtsman ) in core walls doesn't display.

This is easily remedied.
Select the wall and go to its element properties --> Edit/New and under Graphics you will see Coarse Scale Fill Pattern. Select this via the three little dots and choose the desired fill pattern.

Tuesday, 2 September 2008

Want to change the Material of an already created Mass ?

If you have ever tried to do this via the Element Properties you would get the dialogue boxes shown below: 
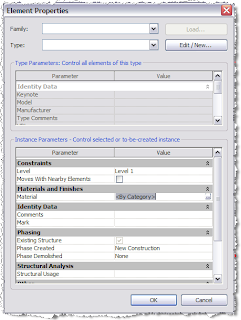
As you can see no hint of how to change it's material ....

To change the Material you need to set up a parameter in your Mass which is easily done. Select your Mass then choose the Edit button
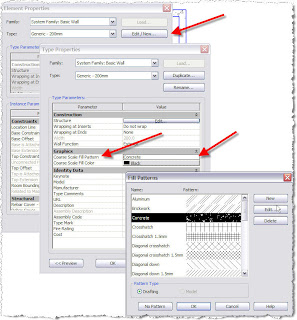
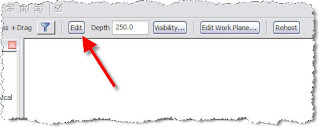
Then go to the Extrusion Properties where you will see the Material defined as . Just to the right is a little button to "add a parameter". Select this button and you will get the Associate Family Parameter dialouge.
Select Add Parameter and fill in the Dialouge box as below:
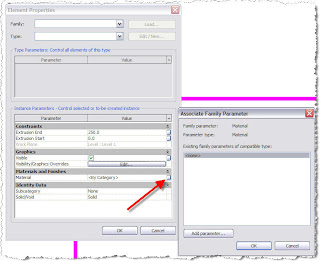
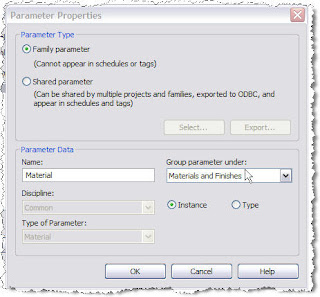
Then OK a few times and Finish Family.
If you now look at the properties of you Mass you will have an option to change the Material