
 I will now try and explain the procedure required to obtain the results shown above.
Let's start with the circular hole ( W_GEN_Beam Service Hole Circ.rfa ). When loaded this can be found under Generic Models.
Go to an elevation of the beam and drag and drop the circular hole family onto it. In this view the outline of the hole is shown in invisible lines, although you can still see and select them when you hover over them as is normal in Revit. Then using Opening By Face cut a hole directly on top of the invisible lines. Use the Pick Lines for the top half and lock the two together.
 Draw the bottom half using the Line Arc tools.
 Finish sketch. You now have your opening locked and aligned to the invisible lines in the family.
Change the Service Hole Diameter in the Element Properties and the physical hole will also change.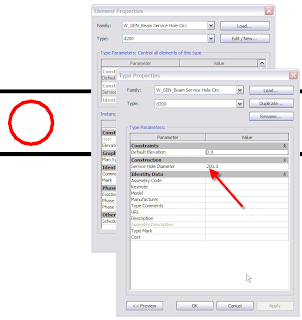
Thus ensuring the two are always in sync.
Thus ensuring the two are always in sync.
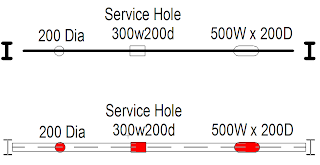
If you look on plan the result should be similar to the example at the beginning.
I would also recommend grouping the two together. Then you can be confident when deleting or moving the hole that you get everything.
Now the Slotted hole ( W_GEN_Beam Service Hole Slot.rfa ). When loaded this can be found under Generic Modles.
As you expect the first part is identical to the Circular Hole. After placing the slotted hole go to the Openning by Face nd use the pick lins for the two semi circular ends and lock them.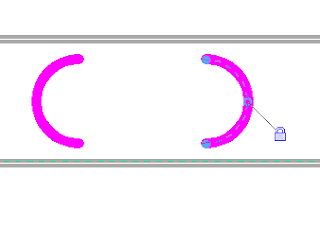 Then draw in the connecting lines without locking and aligning them. This is important because if you do you will over constrain the hole and start getting error messages.
  Finish sketch. You now have your opening locked and aligned to the invisible lines in the family.
Then draw in the connecting lines without locking and aligning them. This is important because if you do you will over constrain the hole and start getting error messages. Finish sketch. You now have your opening locked and aligned to the invisible lines in the family.Change the Service Hole length or depth in the Element Properties and the physical hole will also change.
Now the Rectangular hole ( W_GEN_Beam Service Hole Rect.rfa ). When loaded this can be found under Generic Models.
As you would expect the first part is identical to the previous two holes.
After placing the rectangular hole go to the Opening by Face and use the Pick Lines for the four sides and lock them. 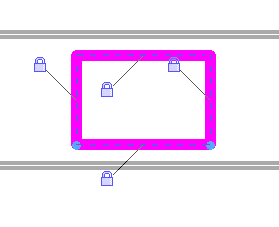 Finish sketch. You now have you pening locked and aligned to the invisible lines in the family.
Finish sketch. You now have you pening locked and aligned to the invisible lines in the family.Change the Service Hole length or depth and the physical hole wil also change.
There are also accompanying Tags for use with these Service Holes and they can be found in \Masterdocs\CAD\Revit\Waterman Families\Annotation and they are called W_T_GEN[Comments][Service Hole Width][Service Hole Depth].rfa W_T_GEN[Comments][Type Name].rfa W_T_GEN[Comments][Service Hole Diameter].rfa They will Tag the holes as shown in the example at the beginning.

